How to run an Ethereum full node on AWS (pre-merge)
cryptoThese instructions were based on the slightly outdated but still extremely helpful thread here.
Running a full ethereum node is both easier and cheaper than you think. It helps you contribute to the network, be self-sovereign, and is fun!
So firstly, a quick high-level overview of what we’re going to do. The challenge is that syncing the chain is really compute, memory, IO, and bandwidth intensive. But running a node is not. So what we’re going to do is sync a node on a beefy EC2 instance, then once the bulk of the syncing has been done, run a cheaper EC2 instance that we will be using to actually run our node in the network. So plan is
- Run a beefy EC2 insance with direct attached storage to first sync to the chain (this will take ~ 12 - 18 hours). Syncing on a beefy instance will cost ~ $10 or less at the time of writing.
- Move all of the saved/downloaded data to dedicated Elastic Block Storage in Amazon
- Attach the volume with that data to a cheaper EC2 instance which we will use run our node
You can have a full eth node running at all times right now (without price optimizations) for ~$70 - $80/month (running w. abt. $55 worth of 550GB of gp2 EBS storage and a t4g.medium EC2 instance). With yearly saving committments, you can probably take this down to somewhere in the $60s range. If you don’t need to have your node running at all times, you can do some fancy tricks that get your usage down to somwhere in the $30 - $40 range (e.g. by taking snapshots of your volume, and provisioning the volume only when you need to use it), but I haven’t played around with it yet, so this is an educated guess.
Obviously, since the size of ethereum state is growing, running a full node will continue to get more expensive over time, but I was still surprised at how easy it was to spin up a node at more of a reasonable price than I had thought (esp. if you can get AWS credits!).
I will be running a geth node for this tutorial and doing a snap sync. Note that running an archive node is substantially more expensive. Even running Erigon (which is a fast Rust-based Ethereum implementation), some light calculations I did rounded out to ~$1500 / month. Using Ethereum BigQuery or Nansen for indexing if you’re considering an archive node would probably be significantly easier for most use-cases.
Instructions to run the node
Step 1
Navigate to AWS. Pick a single availability zone. I’m picking us-east-2 for remainder of this
Step 2
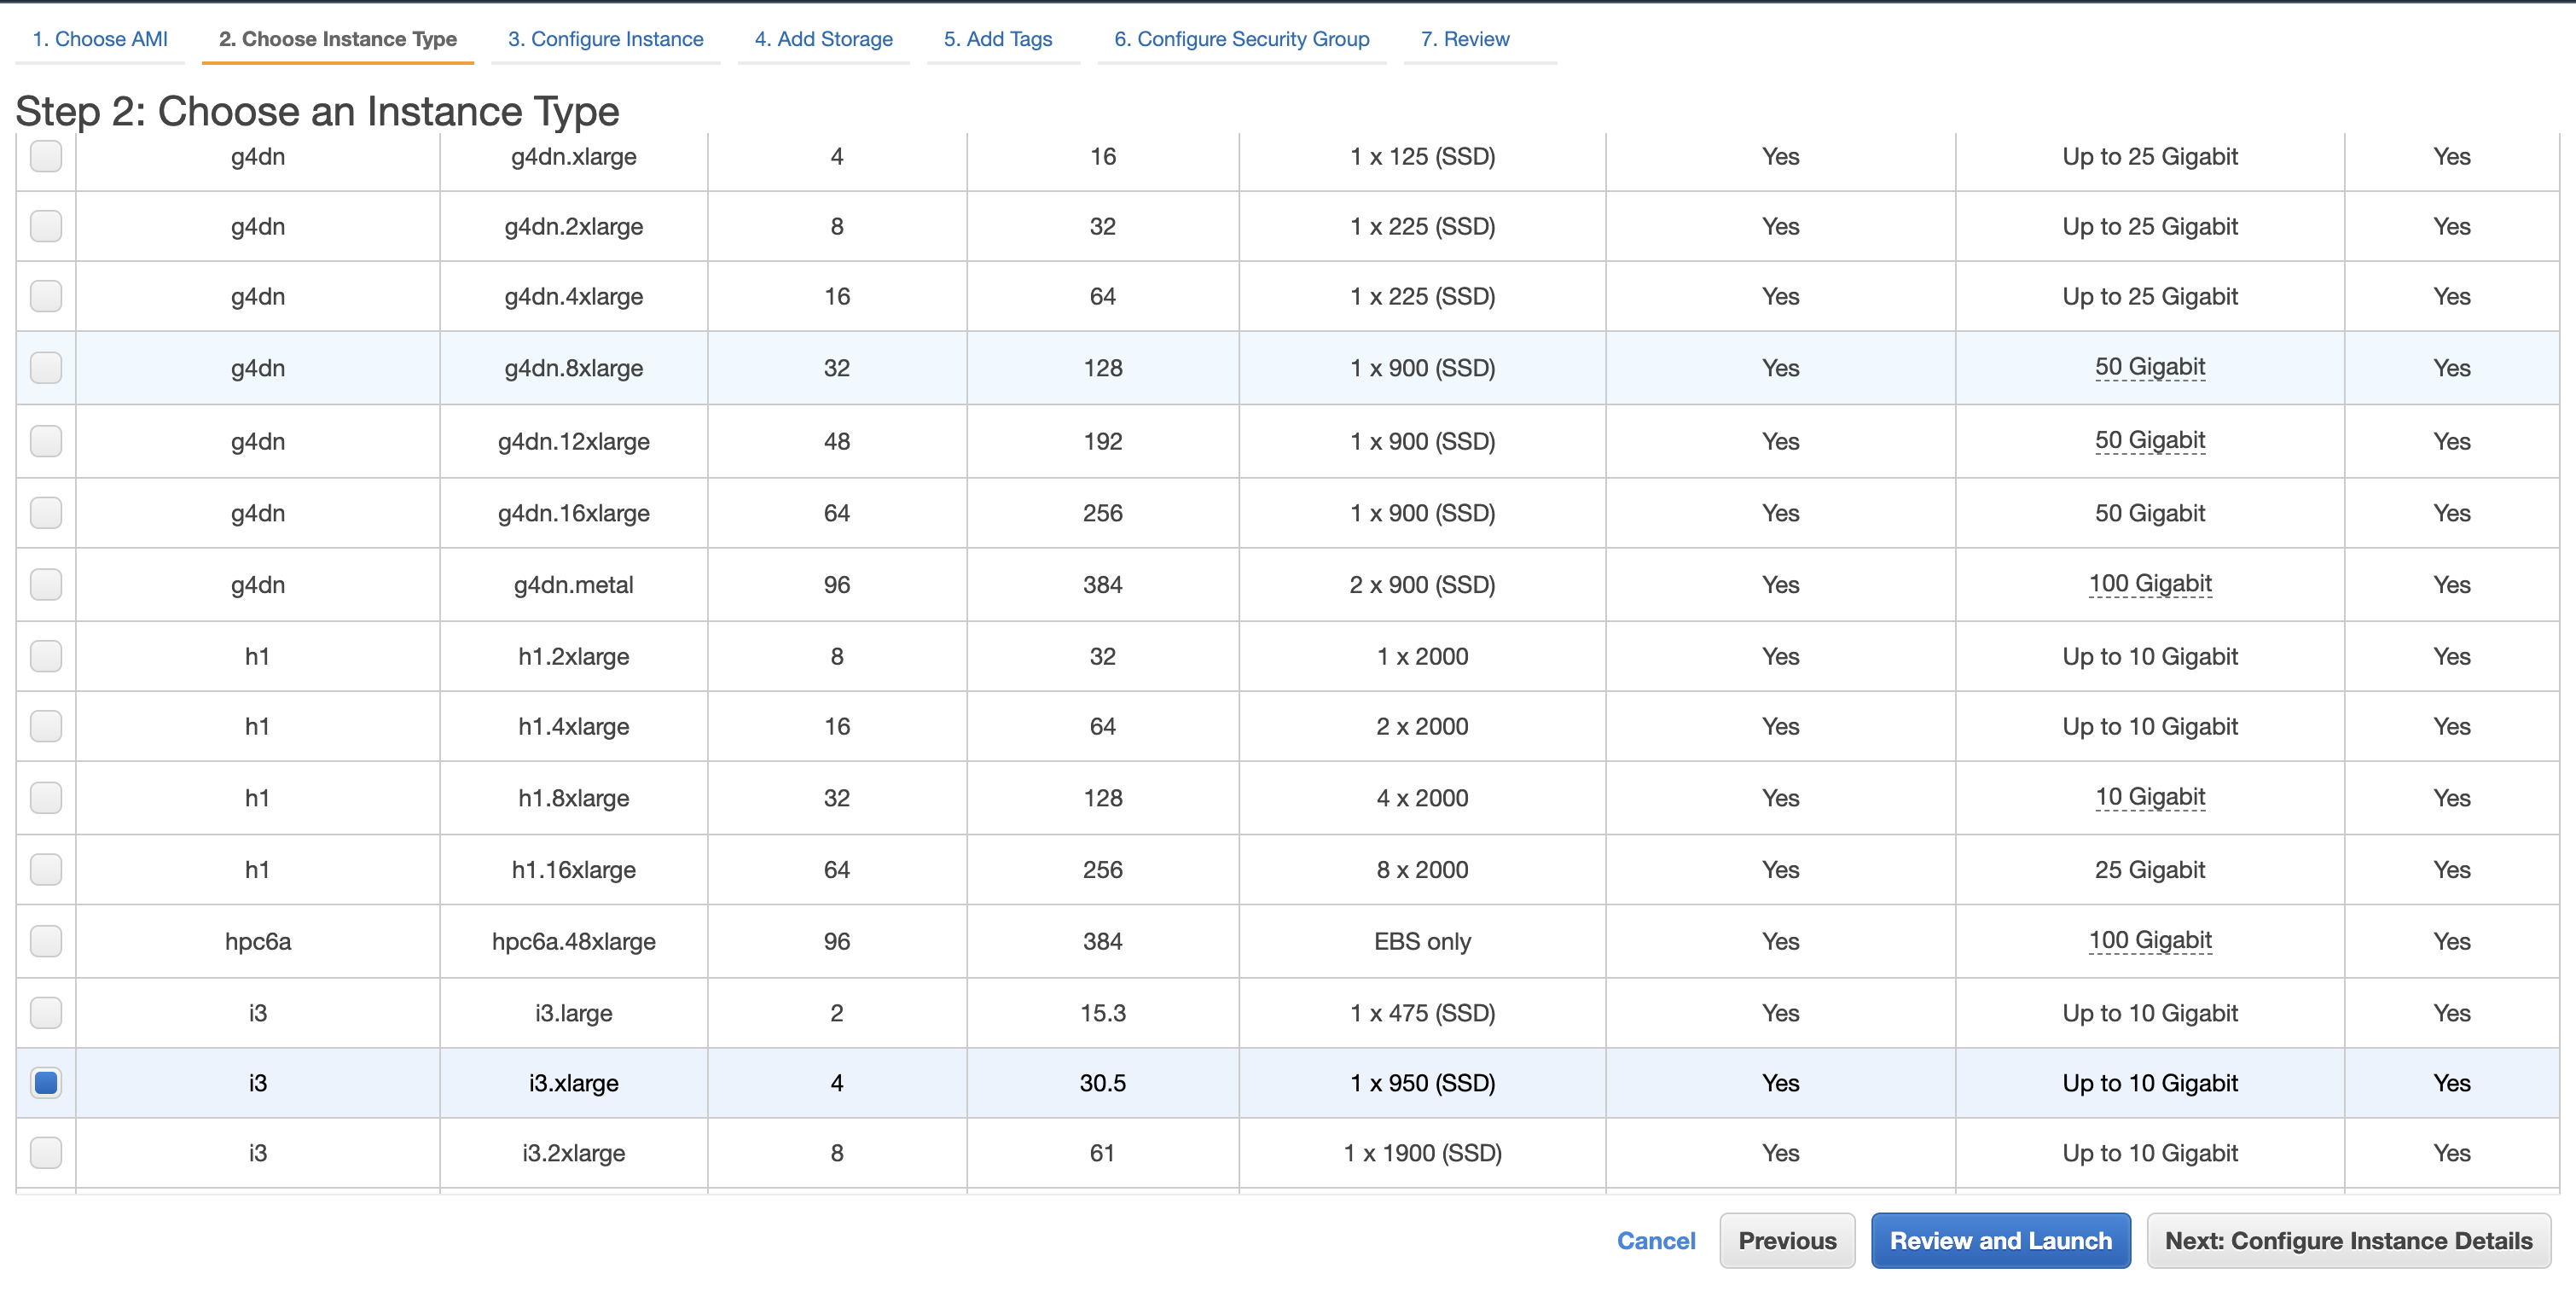
Navigate to the EC2 instances console. Launch an Amazon Linux x64 i3.xlarge instance with Amazon linux x64. Use the default volume size and settings. At $0.30/hour, this is a decently expensive instance, but it will sync fast. Especially because it has direct attached storage.

- pick i3.xlarge
Step 3
Once your EC2 instance is launched, connect to it via ssh - You’ll need to create a private key pair, make it read only via chmod 400 <path/to/key.pem> and then use it to ssh into your machine
Step 4
Download and install geth to the home directory. You can get the latest stable build from here (under linux since that’s what we’re using, make sure you select the 64 bit architecture). Replace whatever the latest build is for you at the time of doing for the links below.
$ wget https://gethstore.blob.core.windows.net/builds/geth-linux-amd64-1.10.17-25c9b49f.tar.gz
$ tar -xzf geth-linux-amd64-1.10.17-25c9b49f.tar.gz
$ mv geth-linux-amd64-1.10.17-25c9b49f/geth ~/
Verify that if you cd ~/ you can see your geth binary.
Step 5
Mount the direct attached storage via the following commands. First check where your mounted storage is with
$ lsblk
- Note if your attached storage does not say
nvme0n1(i.e. if you’re not running ani3.xlarge, replace all instances ofnvme0n1with whatever it does say)
So then we run
$ sudo mkdir /mnt/nvm/
$ sudo mkfs -t ext4 /dev/nvme0n1
$ sudo mount -t ext4 /dev/nvme0n1 /mnt/nvm
$ sudo mkdir /mnt/nvm/ether
$ sudo chown EC2-user:EC2-user /mnt/nvm/ether
Step 6
Start syncing geth with
$ ./geth --datadir /mnt/nvm/ether --syncmode=snap --maxpeers=100 --cache=28000
This took me about 15 hours.
Step 7
You can check when it’s done syncing when the Imported new block headers in console, no longer have an age field.

vs.

You can also check how much storage it’s occupying with df -h if you’re curious. At the time of writing, that’s about 502GB.
Step 8
When syncing is done, navigate to the EC2 dashboard and go the Elastic Block Store value tab on the left.
Click create a new volume with “General Purpose SSD (gp2) type”. Make sure it’s in the same availability zone as your EC2 instance (in your instances, there will be a table with a column for availability zone that will tell you which subnet your EC2 instance is in), and size it to be as large as chain data + some slack. Some very very rough estimates I made show that the amount of disk storage will increase non-linearly starting at around 0.33GB / day. gp2 AWS storage costs around $0.1 per GB-month of provisined storage. I provisioned 1TB to have some slack. But doing somewhere in the 600-700GB range to keep costs low may also work for you.
Step 9
We need to now attach the newly created volume to the EC2 instance. First attach it to your EC2 instance by
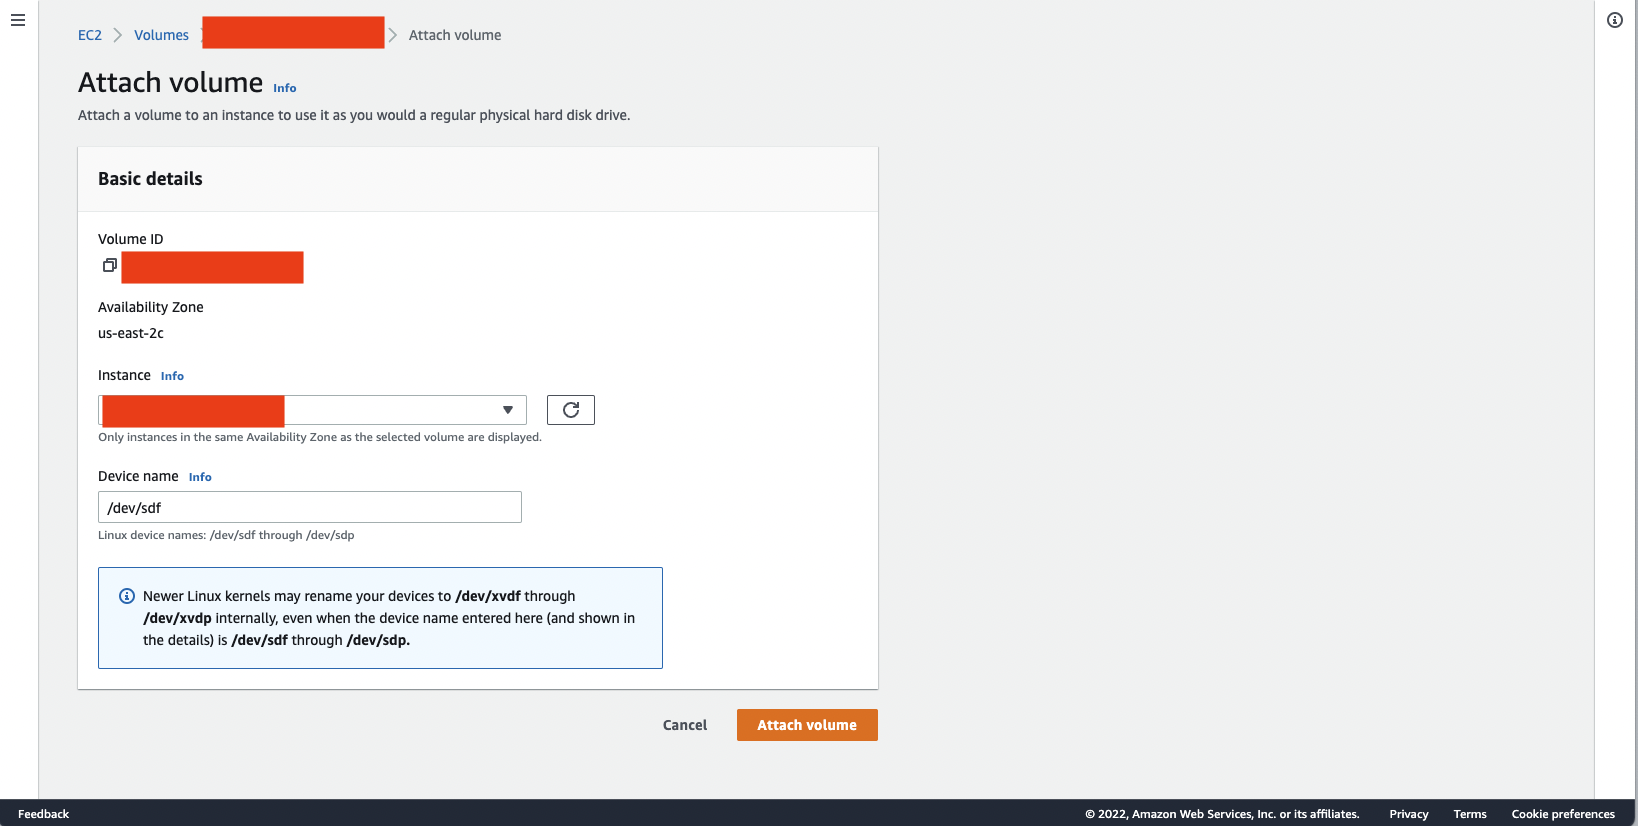
Then format and mount it in your EC2 instance with:
$ sudo mkdir /mnt/export/
$ sudo mkfs -t ext4 /dev/xvda
$ sudo mount -t ext4 /dev/xvdf /mnt/export/
$ sudo mkdir /mnt/export/ether
$ sudo chown EC2-user:EC2-user /mnt/export/ether
Step 10
Copy chain from direct attached storage to the EBS volume. Make sure you’ve stopped running geth before doing this! Otherwise it will not cleanly copy all of the data and you’ll have to delete everything and restart (like I did….)!
$ cp -r /mnt/nvm/ether/* /mnt/export/ether/
This will take somewhere between 1 - 3 hours.
Verify the number of files from chaindata in the new directory is the same
$ ls /mnt/nvm/ether/geth/chaindata/ | wc -l
$ ls /mnt/export/ether/geth/chaindata | wc -l
Step 11
Unmount and detach the EBS volume
$ sudo umount /mnt/export
Then go to the EBS console page, and detach the volume
Step 12
Start the cheap EC2 instance, which from here on you’ll use to run the node.
You can run a t4g.medium for ~ $22 a month. I chose to run a slightly more expensive one because I intend to experiment, so I chose a m5.xlarge. Note make sure you select the availability of this instance to be the same subnet as your EBS volume. You’ll find it in 3. Configure Instance under subnet.
Step 13
ssh into as before and install geth as we did previously. Note if your new EC2 instance is not x86, make sure you get the correct distro
$ wget https://gethstore.blob.core.windows.net/builds/geth-linux-amd64-1.10.17-25c9b49f.tar.gz
$ tar -xzf geth-linux-amd64-1.10.17-25c9b49f.tar.gz
$ mv geth-linux-amd64-1.10.17-25c9b49f/geth ~/
Step 14
Attach our gp2 volume to this new EC2 instance like we did in step 9 in the EBS dashboard for this volume.
Mount it with
$ sudo mkdir /mnt/ebs/
$ sudo mount -t ext4 /dev/sdf /mnt/ebs/
Step 15
Launch the full node again with
$ ./geth --datadir /mnt/ebs/ether/ --syncmode=snap
There will be a little bit of syncing it has to catch up with and our new node also needs to generate gas snapshots, but once that’s done, boom we have a full node!
Step 16 VERY IMPORTANT
Go back to Ec2 console and terminate the i3.xlarge otherwise you’ll keep paying for it!
Conclusion
From here you are set! You can expose an RPC port with a security group to connect to your wallets and Dapps, run a simple web-server behind nginx that does exposes an endpoint, or use another tool that exposes some public port safely.
I’m still experimenting with what’s best for me, but maybe I’ll make another blog post about my findings!
To keep your node running when you’re not sshed into the server, you can use nohup like so
nohup ./geth --datadir /mnt/ebs/ether/ --syncmode=snap
like I’m currently doing! If you want to see the output of the console, you can tail the nohup.out file in a different window like so
tail -f nohup.out
If any of the instructions were not clear or something did not work, please reach out to me so I can fix it!